
|
Frequently Asked Questions (FAQ)
Getting Started
TSD Support hours are Monday - Friday 8AM - 7PM ET; for non-critical questions and concerns, call (978) 296-6187 or email support@tsdweb.com. For critical issues, call TSD's 24/7 Critical Support line at (978) 296-6187 and wait through all prompts. See "Contacting TSD" for more information about critical issues.
Go to: https://cirro.tsdweb.com.
Save the link as a favorite to easily access TSD’s web-based software. You will need to enter your TSD Number, User Name, and Password.
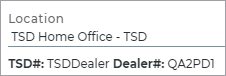
The Location selected at the top of TSD DEALER (or within mobile app settings) is your current virtual location; the list contains all locations (and their associated Location Codes) to which you have viewership; on the web, they are listed in alphabetical order, by Location Name. Below your current Location selection, you'll find your account's TSD Number, as well as your Dealer Number.
On the web, you can change your current location from the 'Home' screen, or Search Open tab. On all other tabs and screens in the application, you can view, but not change, your current location.
TSD offers a suite of video training tutorials covering a wide variety of topics. Click the button from the top menu on your screen to access the Training Hub. You can also click  on a TSD DEALER screen to open an applicable tutorial. See "Training Hub: Tutorials & TSD University" for more information.
See "System Requirements & Supported Devices" for more information.
See "Supported Devices and Peripherals" for more information
- Go to your iOS or Android App Store and download the app.
- Sign in with your online credentials.
Personally Identifiable Information (PII) is data that can be used to identify an individual. Examples include dates of birth, information from driver’s licenses or other identification documents, contact phone numbers and addresses (including email), and credit card data.
TSD is proud of its long history of providing applications that safeguard your confidential data and protect the sensitive information that your customers share with you. Learn how by visiting "System Security (Best Practices)" and "Security and Privacy (TSD's Fuel for Thought)".
- For a general overview of TSD's handling of CCPA requirements, refer to CCPA Information for TSD Clients (PDF).
- To find out about how specific application functions address CCPA requirements, see CCPA Compliance.
Setup
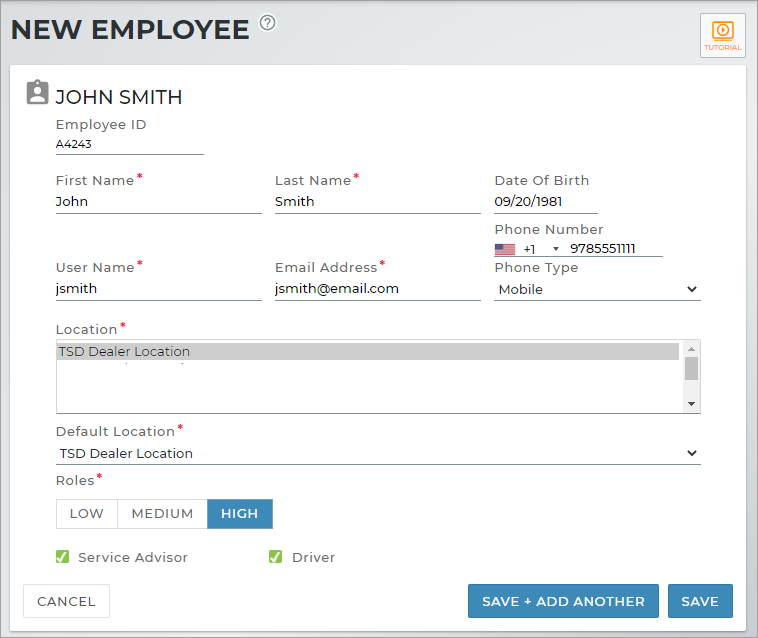
This is a quick reference walkthrough. See "Add a new employee" for full, detailed instructions.
- Go to Admin > Employees tab, and click .
- Enter all required information (*). Assign viewership location, a default location, and a role.
- Write down the employee's User Name and TSD Number, and provide to the employee to use as a reference when he or she logs on for the first time. At that time, he or she will need to create a password.
- Click . An activation link is emailed to the new employee, allowing him or her to create a password and log in with the User Name and TSD Number you provided.
This is a quick reference walkthrough. See "Employee Hub" for more detailed information about employee records.
- Go to Admin > Employees tab.
- Select the employee record and click Edit.
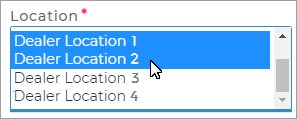
- Select the locations in the Locations box to which you want to grant the employee viewership. To select more than one option in a list, hold the Ctrl key and click the options, or hold the Shift key and select adjacent options.
- Click .
On the Admin Hub, go to the Management tab. Select the check boxes on the left panel to view settings for a location or dealership. See "Management Hub" for more information.
This is a quick reference walkthrough. See "Rates, Charges, Fees & Taxes Setup" for full, detailed instructions.
- Rate charging for different Appointment / Agreement Types (e.g., Rental rates, Test Drive rates, etc.) must be turned on by TSD. Contact TSD Support at support@tsdweb.com for more information.
-
Interested in exposing rates on a website or booking platform through an API? TSD can configure this feature using the Expose Externally setting. Contact your TSD Sales Representative at sales@tsdweb.com for more information.
- Create Model Groups. Edit the Model Groups setting to create Model Groups, if you want one rate for all models or different rates for different model groups (e.g., SUVs, Sedans, etc.).
- (Optional.) Set up a Mileage Charge if you plan to charge customers for miles driven on an agreement.
- Set up rates. Applicable for Rental, Loaner, and Test Drives. Edit the appropriate setting to set up rates for a type of agreement: Rental Rate Setup (for Rental agreements), Loaner Rate Setup (for Loaner agreements), and/or Test Drive Rate Setup (for Test Drive agreements). Add rates by doing the following:
- Create Rate Codes for different types of rates. You can make rates applicable for a certain date range. So, instead of setting up a rate that is valid for its entire existence (until it is either updated or removed), the amount of the rate can vary depending on the time of year.
- Choose whether a Mileage Charge will apply, or whether unlimited miles will be offered. On the Taxes Exempt tab, decide which taxes do not apply to the Rate Code.
- Add hourly, daily, weekly, and monthly rate amounts, as needed.
- For manufacturers that expose rental or loaner rates on a website, expose the Rate Codes to be made available via the online services. Note: This feature is a sold separately. Contact your TSD Sales Representative at sales@tsdweb.com for more information.
- Use the Rate Thresholds Configuration settings to define thresholds for daily, weekly, and monthly rates.
- (Optional.) Set up a Fuel Charge if you plan to charge a per-gallon rate for fuel.
- Set up taxes using the Taxes Setup setting. Apply taxes to rates, fuel, and mileage, as needed.
- Set up surcharges that apply to rate charges using the Surcharge setting, if needed. Apply taxes to the surcharge, as applicable.
- (Optional.) Review and add fees using the Fees Setup setting.
- Adjust the amount and frequency, if applicable.
- Review whether the fee should auto-apply to agreements.
- For manufacturers that expose rates on a website or booking platform, you can expose the fee externally. Note: This feature is a paid module. Contact your TSD Sales Representative at sales@tsdweb.com for more information.
- Select taxes that apply to the fee.
Use the Session Timeout management setting in your Admin Hub to set the number of minutes after which the system logs out a session. It's set to 15 minutes, by default, which means if an employee at your location is idle (that is, without any mouse movement, clicking, or typing on any of your open tabs) for 15 minutes, the employee is automatically logged out. You can increase this length of time up to 30 minutes.
Appointments & Agreements
Yes, license and bar code scanning is available throughout the mobile app. See "Installation & Logging In (Mobile App)"for more information.
If your location has Signature Capture and a form with signature fields (contact TSD Support at support@tsdweb.com for assistance), customers can sign an agreement form via a touch screen monitor or tablet device. Or, you can collect a remote signature by emailing or texting the agreement form to the customer. See "Installation & Logging In (Mobile App)" for more information.
Your daily cap for appointments is the number of appointments that can be scheduled for pickup on any given day for the current location. View your daily cap in your appointment Operations dashboard. See "Appointment Operations and Performance" for more information.
You can determine your daily appointment cap by using the Daily Appointment Cap management setting in Admin Setup.
Based on your management settings, certain fields may be required in order to save an appointment or agreement. See "Manage required fields on appointments and agreements" for more information.
Firstly, your employee role must have the Allow Modify Agreement Rate permission to edit rates on an agreement.
If you have permission, an edit ( ) button is available in the Charges grid. See "Rates, Charges, Fees, and Taxes on Appointments & Agreements" for more information.
- The status of the agreement may be Incomplete or Voided.
- You cannot close an agreement if the Owner Location of the assigned unit is not the current return location.
- Check that you've filled in all required fields, marked with red asterisks (*).
- If you use credit card and payment processing integration, you cannot close an agreement if there is a balance due. You must process a payment and then close.
- Check whether the assigned unit on the voided agreement hasn't been removed from the fleet.
- You cannot void an agreement if the Owner Location of the assigned unit is not the current return location.
The ability to perform an inspection and add damage when opening or closing an agreement is based on the Enable Agreement Inspection management setting.
Note: The Tolls and Violation Filter is unavailable if using the Closed Between date range search fields.
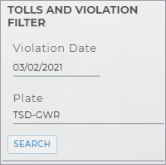
Use the Tolls and Violation Filter on the left panel of the Agreement Hub to search for tolls and violations (e.g., parking tickets) on agreements. Enter a Violation Date, Plate, or both, and click . Agreements in the search results (Open, Closed, and Close Pending) are filtered by date (when the agreement was open) or license plate of the unit assigned to the agreement, based on the search criteria you have entered.
You can view your Operations and Performance dashboards for agreements on the Agreement Hub, or the Search Hub. See "Operations & Performance Dashboards Overview" for an overview of operations and performance, and "Agreement Operations and Performance Dashboard" for more information on agreement metrics, specifically.
You can use the Unit Default Return Status management setting to determine the status to which a unit is set after being returned.
With TSD DEALER's TSD Charging integration (credit card and payment processing), you can securely collect credit card information from your customers, process payments and refunds, and print and email receipts, including on the mobile app! See "Credit Card Processing" for more information.
With TSD DEALER's credit card and payment processing integration, you can securely collect credit card information from your customers to reinforce your rate and fuel replacement policies, as well as toll violations. See "TSD Toll Connect: Toll Processing" for more information.
This is a quick reference walkthrough. See "Perform a Quick Return" for full, detailed instructions.
- When selecting a unit to assign to a new agreement, type the Unit Number of a unit that is In Use.
- Click the Quick Return of [Unit Number] on Agreement [Number] link to perform the quick return in a separate tab.
- Proceed with close pending (to prevent further charges from accruing) or closing the agreement to release the unit by returning it to its default status (such as Ready).
- After the agreement is closed or close pended, you are returned to the original tab with the current in-progress open agreement. The released unit is now assigned and you can proceed with the open agreement process.
Credit Card Processing
You can set up rates, charges, fees, and taxes in the Rates tab of the Admin Hub. See "Rates, Charges, Fees & Taxes Setup" for more information.
You can capture a credit card anytime during the agreement process, but you can only process a payment:
- during the close agreement process or Quick Return.
- after the agreement is closed, for any newly-added fees.
You can print or email an invoice to the customer or to a company (for split invoices), or print or email a payment receipt to a customer after an agreement is closed. See "Payments (At Close Agreement)"
When a toll violation is received, TSD DEALER matches the date and time of the toll violation to the agreement's date range1 for the unit, based on the transponder ID, if available, or the license plate and state, in order to identify the correct agreement & customer to be charged.
- The customer's card on file is billed if: a match is found and Bill Violation Charges (Charge Violations to Customer on mobile) was selected on the agreement.
- The dealership's card is billed if:
- a matching agreement is found and Bill Violation Charges or Charge Violations to Customer was cleared.
- no matching agreement is found.
- the customer's card was charged, but the card was not present or results in a declined charge.
- the agreement was an Internal Use agreement.
Yes! It works just like it does on the web.
Locations with Credit Card Processing provided by Clutch (Stripe) or CenPOS can take pre-authorizations. For these locations, if the Enable Pre-Authorizations option within the Credit Card Required at Open and Pre-Authorization Settings management setting is enabled, a pre-authorization is taken on the agreement.
- Closed Contract Accounting report to view a breakdown of all charges billed to the customer’s card, as well as payments, refunds, and toll violations for closed agreements.
- Dealer Credit Card Reconciliation report to view dealer payments for toll violation charges.
A Violations grid is available on the closed agreement with details of any toll violations incurred on the agreement. These may take up to ten (10) days after the agreement was closed to display.
Fleet Management
This is a quick reference how-to. See "Add a new unit (manually)" for full instructions. If you use fleet import, see "Automated Fleet Import".
- Click the plus icon (
 ) and select New Unit.
 - Enter a unique Unit Number, then type a VIN and press Tab to fill in other fields.
- Enter any remaining required information (*) and click until all information is filled in.
- Review the unit's information and click .
This is a quick reference how-to. See "Remove a unit from your fleet" for full instructions.
- View the unit record and click Remove From Fleet.
- Verify the required information, marked with red asterisks (*).
- Click .
You can view Utilization on the Fleet Performance dashboard. You can also see each individual unit’s utilization by selecting the unit.
This is a quick reference walkthrough. See "Unit Inspections" for full, detailed instructions.
- If outside of an agreement, search for the unit record and click .
- To log a damage entry, click or click a location on the damage diagram. To log the current condition without adding damage, click .
- If logging damage:
- Select or confirm the area of damage (Zone) and select a Damage Type.
- Indicate the severity of the damage (general or chargeable).
- Upload a photo of the damage and/or add any notes.
- Click .
- If logging current condition:
- On the Log Current Condition dialog, upload a photo of the unit and/or add any notes.
- Click . You can resolve a current condition entry at any time by editing () the entry in the Fleet Unit Inspection grid and clicking .
There may be a few reasons why you cannot add or import a unit record:
- Your employee role may not have the Add Fleet or Fleet Import permissions. See "Roles & Permissions".
- Your location uses fleet import.
- The Make of the unit is restricted, based on the Restricted Make management setting in Admin Setup. See "Management Hub".
There may be a few reasons why you cannot manually remove a unit from the fleet:
- Your employee role does not have the Remove From Fleet permission. See "Roles & Permissions".
- The status of the unit may be In Use or Removed From Fleet.
This is a quick reference walkthrough. See "Unit History (Event Logging)" for full, detailed instructions.
- Search for and view the record for which you want to view event logging.
- On the customer, appointment, agreement, or unit record, click the History button on the side panel. Event logging always includes the name of the event (including certain field updates), the employee associated with the event, and date and time of the update.
Reports
This is a quick reference walkthrough. See "Reporting: Overview" for full, detailed instructions.
- On the Reports dialog, select an available system or custom report. (Click in the Custom Reports section to start building your own custom report. See "Report Builder for Custom Reports" for more information.
- If necessary, edit the reporting Start Date and End Date.
- Click .
Many of our reports are customizable for your viewing preferences. See "Reporting: Overview" for a full list of reports, customization and sorting options, and column descriptions.
The following predefined, system reports are available on the Reports dialog for your current location, depending on your employee role permissions:
In addition to reports, TSD DEALER's centralized Operations and Performance dashboards offer live data for your current location, including helpful agreement and fleet metrics, allowing you to pick and choose what information matters to your business.
- Appointment Summary Report. Appointments scheduled to be picked up at your location in a certain date range.
- Closed Contract Accounting Report. A summary and detailed breakdown of how much revenue in rates, charges, fees, and taxes your location is generating from closed agreements.
- Credit Card Transactions Report. Credit card transaction details from a given time period.
- Dealer Credit Card Reconciliation Report. For locations with TSD Charging (credit card and payment processing) and toll processing, view dealer payments for toll violation charges.
- Delivery and Collection Report. For locations with TSD's Delivery and Collection integration, view key Delivery and Collection information about your agreements.
- Do Not Loan Report. Customer records that have been flagged as Do Not Loan. Available for employees roles with permission.
- Full Inventory Report. All active units currently at your location.
- Length of Use (LOU) Report. LOU information, broken down by service advisor.
- Service Advisor Report. Key agreement information for locations using Reynolds Integration, including Time to Close (after invoiced RO), broken down by service advisor.
- Test Drive Report. Key information for your Test Drive agreements opened within a certain period.
- Turn Rate Report. The average monthly Turn Rate for each active unit in your fleet, as well as your total fleet's average monthly Turn Rate.
- Uber Ride Report. Key information about Uber Ride agreements.
- Unit Mileage by Agreement Report. The number of miles driven on each agreement, grouped by unit.
- Utilization Report. The percentage of time each unit in your location's fleet has been in use.
You can adjust sorting and customize your report options for optimal viewing. Depending on the report, you can:
- Choose and reorder report columns.
- Sort results by a column.
- Filter results.
Run the report, and click or (depending on the report).
A description of key reporting columns is available in the Help topic for the report.
A button is available on your Operations dashboard to update your metrics.
© 2026 TSD Rental, LLC